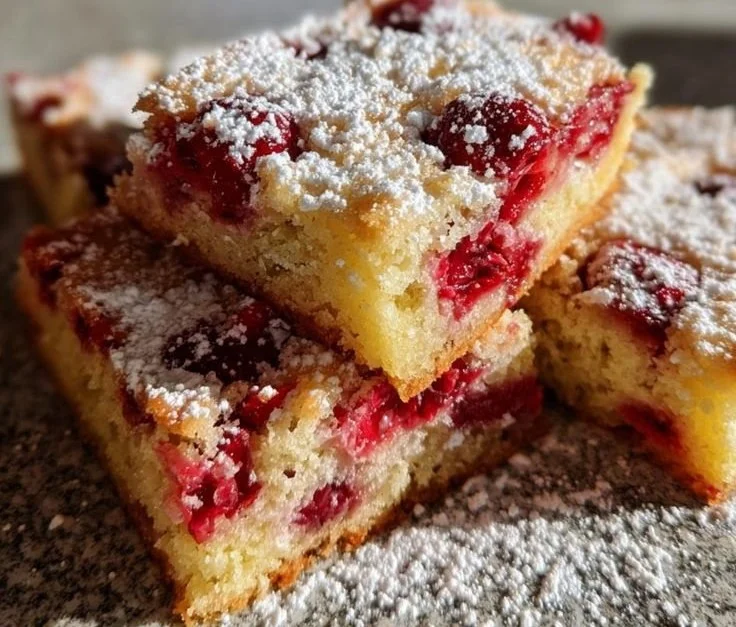
Christmas Cherry Bars are not just a treat; they capture the essence of the festive season in every delicious bite. With their sweet cherry filling nestled in a buttery, crumbly base, these bars become an instant favorite during holiday gatherings. The vibrant color and delightful aroma that fill your kitchen make them perfect for sharing—whether at a cozy family dinner or a holiday party. Get ready to create a dessert that will be cherished and requested year after year!
Why Make This Christmas Cherry Bars
These festive cherry bars offer a perfect balance between sweet and tart, making them a delightful addition to your holiday dessert table. They’re simple to make, requiring just a handful of ingredients that you probably already have at home. Plus, they pack well for gifting or taking to parties—just slice, sprinkle with powdered sugar, and present them on a beautiful platter. The cheerful pop of red cherry filling provides both visual and flavor appeal, ensuring that these bars will be the highlight of your holiday festivities.
How to Make Christmas Cherry Bars
Making Christmas Cherry Bars is straightforward and enjoyable. You’ll love how quickly they come together! These bars are great for bakers of all skill levels. Start by gathering your ingredients and preheating the oven so it’s at the right temperature once your batter is ready to bake. Follow the simple steps below, and you’ll have a delicious dessert in less than an hour!
Ingredients:
- 2 cups all-purpose flour
- 1/2 cup granulated sugar
- 1/2 teaspoon baking powder
- 1/4 teaspoon salt
- 1 cup unsalted butter, softened
- 1 cup cherry pie filling
- 1/2 teaspoon vanilla extract
- 1 egg
- Powdered sugar for dusting (optional)
Directions:
- Preheat the oven to 350°F (175°C) and grease a 9×13-inch baking pan.
- In a bowl, mix flour, sugar, baking powder, and salt.
- Add softened butter, cherry pie filling, vanilla extract, and egg to the dry ingredients. Mix until well combined.
- Pour the batter into the prepared pan and spread evenly.
- Bake for 25-30 minutes or until golden brown and a toothpick inserted in the center comes out clean.
- Let cool, then dust with powdered sugar before slicing into bars and serving.
Nutritional Information
Per serving (1 bar, based on 16 servings):
- Calories: 180
- Total Fat: 10g
- Saturated Fat: 6g
- Cholesterol: 40mg
- Sodium: 90mg
- Total Carbohydrates: 22g
- Dietary Fiber: 0g
- Sugars: 10g
- Protein: 2g
How to Serve Christmas Cherry Bars
These Christmas Cherry Bars shine on their own, but a few serving ideas can elevate them even more. Consider pairing them with a scoop of vanilla ice cream or a dollop of whipped cream for a comforting dessert. Drizzling chocolate sauce or hot fudge over the top adds an exciting twist. For gatherings, you can cut them into festive shapes using cookie cutters, which adds a fun element for kids and adults alike!
How to Store Christmas Cherry Bars
To store your Christmas Cherry Bars, place them in an airtight container at room temperature for up to 3 days. If you want them to last longer, refrigerate them for up to a week. You can also freeze them! Wrap them tightly in plastic wrap and place them in a freezer-safe bag for up to 3 months. When you’re ready to enjoy, let them thaw at room temperature, and dust with powdered sugar just before serving for that fresh bakery touch!
Expert Tips for Perfect Christmas Cherry Bars
- Choosing cherries: Opt for a good-quality cherry pie filling for the best flavor. If you have fresh cherries available, you can also make your filling!
- Uniform baking: Spread the batter evenly in the pan to ensure consistent baking. Use a spatula to smooth it out nicely.
- Check for doneness: Ovens can vary, so start checking your bars a few minutes before the recommended baking time. The top should be golden, and a toothpick inserted should come out clean.
- Enhanced flavor: Add a pinch of almond extract for an additional depth of flavor that pairs beautifully with cherries.
Delicious Variations
- Chocolate Cherry Bars: Swirl in some chocolate chips into the batter for a rich chocolaty flavor.
- Nutty Crunch: Add chopped pecans or walnuts to the batter for a delightful crunch and added texture.
- Gluten-Free Version: Substitute the all-purpose flour with a gluten-free flour blend and ensure that other ingredients are gluten-free.
Frequently Asked Questions
1. Can I use fresh cherries instead of pie filling?
Absolutely! You can create your own cherry pie filling using fresh or frozen cherries. Just cook them with sugar and a bit of cornstarch until they thicken.
2. Can I make this recipe ahead of time?
Yes, you can make these bars a day in advance. Just store them covered tightly, then dust with powdered sugar right before serving.
3. How do I know when the bars are done baking?
Check for a golden color on the edges and use a toothpick inserted in the center; if it comes out clean or with a few crumbs, the bars are ready.
Conclusion
Christmas Cherry Bars are a delightful treat that blend the warm flavors of butter and cherries, creating an irresistible dessert that everyone will adore. They’re easy to whip up, perfect for gatherings, and taste divine with or without extra toppings. I encourage you to try making them this holiday season. They might just become your new favorite tradition! Share your experience and any personal twists you add to the recipe—let’s spread the joy of baking together!