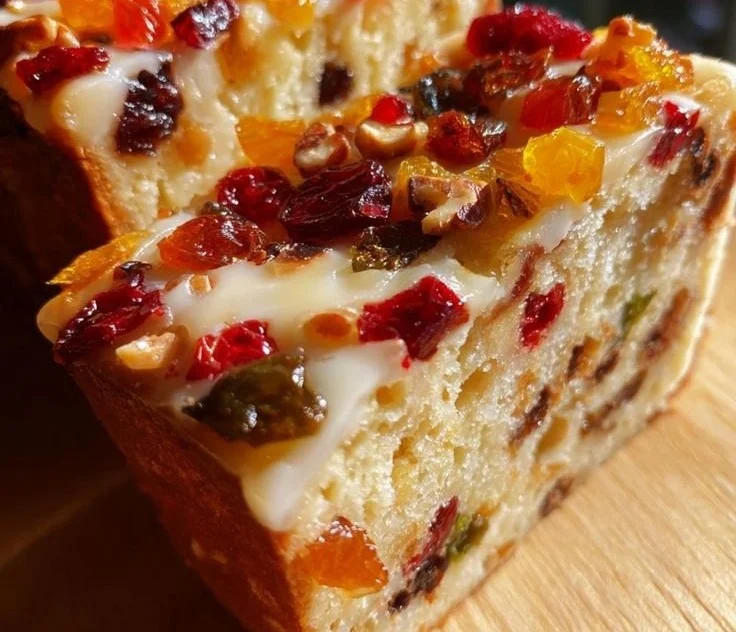
Christmas is a time for celebration, warmth, and, of course, delightful treats! One of the most beloved traditions during this festive season is baking the all-time favorite Christmas Cake. This rich and aromatic cake is packed with dried fruits and nuts, making it not only a season’s sweet delight but also a beautiful centerpiece for your holiday gatherings. Here, we will explore why making this Christmas Cake is a brilliant idea, how to create it step-by-step, and additional tips to enhance your baking experience.
Why Make This Christmas Cake
There’s something magical about the flavors of a Christmas Cake that bring nostalgia and joy. Rich with spices and encased in a moist texture, each bite transports you to cozy winter evenings. Not only does this cake fill your kitchen with heavenly scents, but it also makes a perfect gift for loved ones or a delightful dessert for festive gatherings. With its delightful mix of dried fruits and crunchy nuts, this cake is not just scrumptious but also visually appealing, ensuring it will be a showstopper on your holiday table.
How to Make Christmas Cake
Making a Christmas Cake is easier than you might think. With just a few everyday ingredients and simple steps, you can whip up this festive treat that’s sure to impress everyone. The process involves creaming butter and sugar, mixing in eggs, and then gradually adding the dry ingredients and the fruity goodness. It’s a fun and satisfying endeavor that invites family and friends to join in on the holiday spirit.
Ingredients:
- 2 cups mixed dried fruits (raisins, currants, candied orange peel)
- 1 cup chopped nuts (walnuts, pecans)
- 1 cup unsalted butter, softened
- 1 cup brown sugar
- 4 large eggs
- 2 cups all-purpose flour
- 1 teaspoon baking powder
- 1 teaspoon ground cinnamon
- 1/2 teaspoon ground nutmeg
- 1/4 teaspoon salt
- 1/2 cup milk
Directions:
- Preheat the oven to 350°F (175°C). Grease and flour a cake pan to ensure your cake will release easily once baked.
- In a bowl, cream together the butter and brown sugar until light and fluffy, creating a wonderful base for your cake.
- Beat in the eggs one at a time, mixing well after each addition to ensure all ingredients blend smoothly.
- In another bowl, combine the flour, baking powder, cinnamon, nutmeg, and salt. Gradually add this mixture to the butter mixture, alternating with the milk, and mix until just combined.
- Gently fold in the dried fruits and nuts, letting their enchanting textures and flavors infuse the batter.
- Pour the batter into the prepared cake pan and smooth the top for an even finish.
- Bake for about 50-60 minutes or until a toothpick inserted into the center comes out clean, filling your home with warm and inviting aromas.
- Allow to cool in the pan for 10 minutes before transferring to a wire rack to cool completely, giving your cake the perfect texture.
- Serve and enjoy the festive flavors that celebrate the spirit of Christmas!
Nutritional Information
Each serving (1 slice) of Christmas Cake contains approximately:
- Calories: 300
- Total Fat: 15g
- Saturated Fat: 9g
- Cholesterol: 80mg
- Sodium: 150mg
- Total Carbohydrates: 38g
- Dietary Fiber: 2g
- Sugars: 18g
- Protein: 4g
(Note: Nutritional values may vary based on portion size and specific ingredients used.)
How to Serve Christmas Cake
This beautiful cake is best served at room temperature, allowing the delightful flavors to shine. Consider topping it with a dusting of powdered sugar, or serve it with a scoop of whipped cream or a side of lightly sweetened crème fraîche for an added touch of decadence. It pairs wonderfully with a cup of hot tea or coffee, making it a perfect treat for cozy afternoons with family and friends.
How to Store Christmas Cake
To keep your Christmas Cake fresh, wrap it tightly in plastic wrap or aluminum foil and store it in a cool, dry place. It will last up to a week at room temperature, but you can also refrigerate it to extend its shelf life up to two weeks. If you want to keep it longer, consider freezing the cake. Wrap it well and freeze it for up to three months. Just remember to thaw it in the refrigerator before serving.
Expert Tips for Perfect Christmas Cake
- Add Flavor: For an extra kick, try soaking your dried fruits in rum or brandy overnight. This enhances the flavor and adds sophistication to your cake.
- Don’t Overmix: Mix until just combined to avoid a dense cake. Overmixing can toughen the texture.
- Check for Doneness: Ovens can vary, so start checking your cake around the 50-minute mark. It’s done when a toothpick inserted into the center comes out clean.
- Decorate Wisely: After cooling, you can frost it with almond icing, or simply top it with more candied fruits for a festive look.
Delicious Variations
Feel free to experiment with this Christmas Cake! Here are some variations you might enjoy:
- Chocolate Christmas Cake: Add some cocoa powder for a rich chocolate flavor.
- Spiced Citrus Cake: Incorporate zest from oranges or lemons for a zesty twist.
- Nut-Free Option: Swap nuts for more fruits or even chocolate chips for a delightful chocolatey experience.
Frequently Asked Questions
1. Can I make this cake ahead of time?
Yes! In fact, making it a week or two in advance can enhance the flavors as they meld together. Just be sure to store it properly.
2. Can I substitute the dried fruits?
Absolutely! You can use any combination of dried fruits you like, such as apricots, figs, or prunes. Just keep the total quantity the same.
3. Is there a gluten-free version?
Certainly! You can use a gluten-free all-purpose flour blend in place of regular flour. This will cater to those with gluten sensitivities.
Conclusion
Baking a Christmas Cake is not just about making a dessert; it’s about celebrating the season and creating memories with loved ones. With its rich flavors, festive appeal, and the warmth it brings to your table, this cake is sure to be a hit. So gather your ingredients, follow the steps, and enjoy the process! Don’t forget to share your baking experience and results. Happy baking, and may your holiday season be filled with joy and sweet treats!